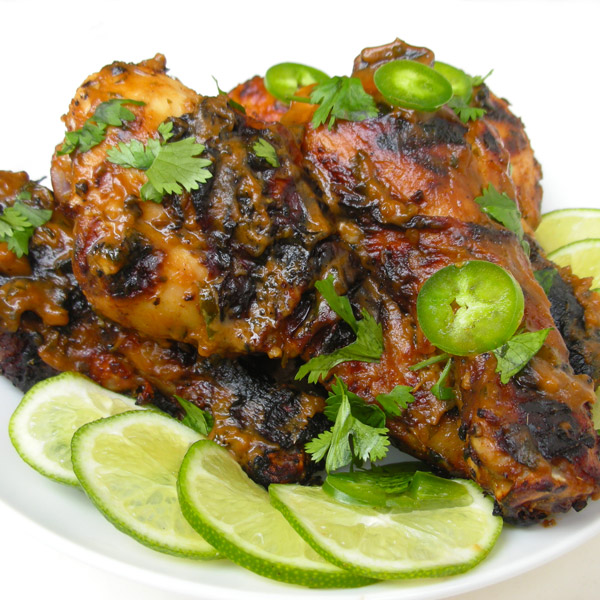
November 5, 2012

lightened up pumpkin cake with maple cinnamon cream cheese frosting

Print Friendly

lightened up pumpkin cake with maple cinnamon cream cheese frosting

Pumpkin time again, this time in the form of a cake. A cake with 55% LESS CALORIES THAN THE ORIGINAL (!!!) Say hello to this light pumpkin cake!

I came across this recipe and immediately fell in love. I guess I’m back in the swing of pumpkin things. Or I just really love cake. Either or.

The issue is even though I looove 3-layer cakes, I had to be a little practical here. I do not need a 3-layer cake. That’s right. I do not need a 3-layer cake.

Because I would rather have a lightened up 2-layer pumpkin cake AND maybe make some cookies, than just the 3-layer pumpkin cake alone. I’m all about variety. I should probably love Tapas-style restaurants more.

In addition to reducing the size of the cake, I replaced whole milk with vegetable oil with applesauce, full fat cream cheese with 1/3 reduced fat cream cheese, and maple syrup with sugar free pancake syrup, saving a whopping 486 CALORIES!!! Just for a few lower calorie swaps!!

Tips: Instead of Laughing Cow Cinnamon Cream Cheese, you can use 1/3 reduced-fat or fat-free cream cheese, plus an additional 1/2 teaspoon cinnamon. The nutritionals will vary slightly.

lightened up pumpkin cake with maple cinnamon cream cheese frosting

lightened up pumpkin cake with maple cinnamon cream cheese frosting

makes 4 servings

  • Ingredients
  • Cake
  • 1 1/2 cups all-purpose flour
  • 3/4 teaspoon baking soda
  • 1/4 teaspoon salt
  • 6 tablespoons unsalted butter, softened
  • 1 cup granulated sugar
  • 1 large egg
  • 1/2 tablespoon vanilla extract
  • 7.5 ounces (half a 15 oz can) pumpkin puree
  • 1/4 cup unsweetened applesauce
  • 1/2 cup milk
  •  
  • frosting
  • 6 ounces/8 wedges/an entire package The Laughing Cow Smooth Sensations Light Cinnamon Cream Cheese Spread
  • 6 tablespoons unsalted butter, softened
  • 1 1/2 tablespoons sugar-free pancake syrup
  • 1 teaspoon vanilla
  • 1 teaspoon cinnamon
  • 3 cups powdered sugar

Preheat the oven to 300 degrees. Spray two 8 or 9 inch round cake pans with nonstick spray.

Add the flour, baking soda, and salt to a bowl and stir to combine.

In a separate bowl, beat the butter and sugar until light and fluffy. Add the egg and beat until mixed. Add the vanilla, pumpkin, and applesauce. On low, stir in half the flour mixture. Add half the milk. Finally stir in the rest of the flour until uniform.

Pour half the batter into each cake pan and smooth out until level. Bake for 25 – 35 minutes until a toothpick inserted into the center comes out clean. Cool completely.

In the meantime, make the frosting. Beat the cream cheese and butter until smooth and uniform. Beat in the syrup, vanilla, and cinnamon. Slowly add the powdered sugar and beat until smooth.

Pop one of the cake layers out of the pan and onto a serving platter. Frost the top layer, taking care to leave enough frosting for the top and outsides of the cake. Place the second cake layer on top, and cover top and sides with remaining frosting.

Original recipe, per serving: 878 calories, 40 g fat, 532mg sodium, 136g carbohydrates, 8g protein

Lightened Up recipe, per serving: 392 calories, 15g fat, 301mg sodium, 63g carbohydrates, 4g protein

October 30, 2012

chicken chili verde + vegetarian option

Print Friendly

Chicken Chili Verde Recipe

I’ve never been much of a chili fan. I don’t know why. It just never floated my boat. Maybe it’s because I’m not a fan of ground beef crumbles. I don’t like the texture, which is a major reason why I was able to be a vegetarian for eight years and not miss beef at all.

Chicken Chili Verde Recipe

I gravitate towards this delicious chili recipe because 1. It does not have ground beef, and 2. its flavor is completely different from traditional chili. The green chiles, oregano, cumin, and cilantro all come together for more of a Mexican feel. Great on its own and even better topped with light sour cream or chunks of avocado.

Tips: This can easily be made vegetarian. Just use vegetable broth and add in another type of bean (black beans would be great!) and even kale or spinach could be thrown in with the cilantro at the end. I like to double this recipe and freeze the leftovers in one or two serving containers for a quick dinner or lunch.

Chicken Chili Verde Recipe

chicken chili verde

makes 4 servings

  • Ingredients
  • 2 teaspoons olive oil
  • 1 large yellow onion, chopped
  • 4 oz green chile peppers
  • 4 oz diced jalapenos
  • 4 cloves garlic, minced
  • 1 1/4 teaspoons oregano
  • 2 teaspoons cumin
  • 1 teaspoon chili powder
  • 3 cups vegetable or chicken broth
  • 2 – 15.5 ounce cans cannellini beans, not drained
  • 2 cups cooked, shredded chicken breast
  • 1/4 teaspoon black pepper
  • 1/4 cup chopped fresh cilantro
  • Light sour cream, if desired

Heat 2 teaspoons of olive oil in a large pot. Add onion and cook until golden and soft, about 5 minutes. Add the chiles, jalapeno, garlic, oregano, cumin, and chili powder. Stir and cook for 3 minutes.

Add the broth, beans, and chicken. Simmer for 20 minutes.

Season with salt and pepper. Add the fresh cilantro and cook for another 5 minutes. Serve each portion topped with light sour cream, if you desire!

Per serving, with chicken: 350 calories, 6.5g fat, 1439mg sodium, 42g carbohydrates, 37g protein

Per serving, vegetarian with black beans: 337 calories, 4g fat, 1472mg sodium, 60g carbohydrates, 22g protein

October 27, 2012

daring bakers challenge october 2012: mille-feuille

Print Friendly

Our October 2012 Daring Bakers’ challenge was hosted by Suz of Serenely Full. Suz challenged us to not only tackle buttery and flaky puff pastry, but then take it step further and create a sinfully delicious Mille Feuille dessert with it!

Once again, I was really challenged. My puff pastry dough came out fine, no problems there, but making the Mille Feuille was just a disaster. My puff pastry wasn’t weighed down evenly when I baked it, and my oven runs a little hot, so it overcooked and curved up instead of laying flat. For my cream, I used fat-free milk, which I KNEW would end up being problematic, but I didn’t do anything to correct it. I should have tried using more cornstarch to thicken it up. My cream turned out more pudding-like in texture, so when I began layering it between the sheets of puff pastry, it oozed out everywhere. I mean EVERYWHERE. Onto the board, then down onto the counter, then on the floor, then all throughout the fridge. My chocolate topping got a little messy too in spots, then the royal icing also started dripping everywhere. It was just one big mess, BUT it does taste good! I just didn’t have the patience in me any more to take any professional photos, so I settled for iPhone shots.

mille-feuille

serves 10

  • Ingredients

  •  
  • Puff Pastry
  • 1¾ cup (250g) plain/all-purpose flour
  • Scant ¼ cup (55 ml) (1¾ oz)(50g) unsalted butter, chilled and cubed
  • 1 teaspoon (5ml) (6 gm) salt
  • ½ cup plus 2 tablespoons (5/8 cup)(150 ml) cold water
  • 14 tablespoons (210 ml) (7 oz) (200g) butter (for the beurrage), room temperature
  • 3½ tablespoons (55ml) (30g) plain flour (for the beurrage)

  •  
  • Pastry Cream
  • 2 cups (450ml) whole milk
  • ¼ cup (1¼ oz)(35 gm) cornstarch
  • 1 cup less 1 tablespoon (200gm) (7 oz) caster sugar
  • 4 large egg yolks (if you’re making the royal icing, reserve two egg whites)
  • 2 large eggs
  • ¼ cup (2 oz) (60gm) unsalted butter, cubed
  • 2 teaspoons (10 ml) vanilla extract

  •  
  • Mille-Feuille
  • 1 batch pâte feuilletée/puff pastry (see above)
  • 1 batch crème pâtissière/pastry cream (see above)
  • 2 ¾ cups (660 ml) (12⅓oz) (350gm) powdered sugar
  • 2 teaspoons (10 ml) lemon juice
  • 2 large egg whites
  • ½ cup (2¾ oz) (80gm) dark chocolate

For the pastry:

1. Cut the larger quantity of butter into smallish pieces and set aside at room temperature.
2. Put the larger quantity of flour into a bowl with the salt and the cold, cubed butter.
3. Lightly rub the butter and flour between your fingertips until it forms a mealy breadcrumb texture.
4. Add the cold water and bring together with a fork or spoon until the mixture starts to cohere and come away from the sides of the bowl.
5. As the dough begins to come together, you can use your hands to start kneading and incorporating all the remaining loose bits. If the dough’s a little dry, you can add a touch more water.
6. Knead for three minutes on a floured surface until the dough is smooth.
7. Wrap in clingfilm and refrigerate for at least 30 minutes.
8. While the dough is chilling, take your room temperature butter and mix with the smaller amount of plain flour until it forms a paste.
9. Place the butter paste between two sheets of clingfilm, and either with a rolling pin or your hands (I found hands easiest) shape it into a 4.5”/12cm square. You can use a ruler (or similar) to neaten the edges.
10. Refrigerate for about 10-15 minutes so the butter firms up slightly. If it’s still soft, leave it a bit longer. If it’s too hard and inflexible, leave it out to soften a touch. You want it to be solid but still malleable.
11. Once the dough has chilled, roll it out on a floured surface into a 6”/15cm square. Place the square of butter in the middle, with each corner touching the centre of the square’s sides (see photo below).
12. Fold each corner of dough over the butter so they meet the centre (you might have to stretch them a little) and it resembles an envelope, and seal up the edges with your fingers. You’ll be left with a little square parcel.
13. Turn the dough parcel over and tap the length of it with your rolling pan to flatten it slightly.
14. Keeping the work surface well floured, roll the dough carefully into a rectangle ¼ inch /6 mm in thickness.
15. With the longest side facing you, fold one third (on the right) inwards, so it’s covering the middle section, and ensure that it is lined up.
16. Then, fold the remaining flap of dough (on the left) inwards, so you’re left with a narrow three-layered strip.
17. Repeat steps 14, 15, 16.
18. Wrap up in clingfilm and chill for at least 30 minutes.
19. Repeat steps 14, 15, 16 twice.
20. Wrap up in clingfilm and chill again for at least 30 minutes.
21. Repeat steps 14, 15, 16 two final times.
22. Wrap up in clingfilm and refrigerate until needed. The dough keeps a couple of days in the fridge.

For the pastry cream:

1. Mix the cornflour/cornstarch with ½ cup of milk and stir until dissolved.
2. Heat the remaining milk in a saucepan with the sugar, dissolving the sugar and bringing the milk to the boil. Remove from heat.
3. Beat the whole eggs into the cornflour/milk mixture. Then beat in the egg yolks. Pour in 1/3 of the hot milk, stirring constantly to prevent the eggs from cooking.
4. Now, bring the remaining milk back to the boil, and add the eggy mixture, whisking as your pour. Keep whisking (don’t stop or it’ll solidify) on a medium heat until the mixture starts to thicken.
5. Remove the saucepan from the heat and thoroughly whisk the pastry cream. At this stage the pastry cream can look slightly lumpy, but a good whisking soon makes it smoother.
(N.B. If you’re worried about the pastry cream continuing to cook off the heat, you can transfer it to a stainless steel/ceramic bowl.)
6. Beat in the butter and vanilla until fully incorporated.
7. If you haven’t already, pour the pastry cream into a stainless steel or ceramic bowl, and then place clingfilm over the surface to stop a skin forming.
8. Refrigerate overnight to give the pastry cream time to further thicken.

For the mille-feuille:

1. Preheat oven to moderately hot 200 °C /400°F/gas mark 6.
2. Lightly dust your work space with flour and remove your dough from the fridge.
3. Roll into a large rectangle, the thickness of cardboard. The recipe I followed specified no other dimensions, but I rolled mine to about 12”/30cm x 18”/46cm.
(I found it easiest to start the rolling on the work surface, and finish it off on a large piece of greaseproof paper. That way it’s easier to move the sheets of pastry around.)
4. Cut into three equal pieces and place on a baking tray. If you don’t have space for all three, you can bake them separately.
5. Prick the pastry sheets all over with a fork.
6. Place another sheet of greaseproof paper over the top and then a heavy baking tray. This will prevent the layers from puffing up too much.
(N.B. I found my baking trays weren’t heavy enough, so also used a pyrex dish to add more weight. Just ensure that the pastry sheets are evenly weighted down.)
7. Bake each sheet for about 25 minutes in a moderately hot oven 200 °C /400°F/gas mark 6, removing the top layer of greaseproof paper/tray 10 minutes before the end for the tops to brown. Keep an eye on them and lower the temperature if you think they’re browning too much.
8. Remove the baked sheets from the oven and leave on a wire rack to cool.
9. Once the pastry has cooled, you’re ready to assemble your mille-feuille. Get a sturdy flat board, your pastry and the chilled crème pâtissière from the fridge.
10. Lay one sheet on the board and spread half the crème patisserie evenly over the top.
11. Take the second sheet and place it on top, pressing down lightly with your hands to ensure that it sticks to the filling.
12. Spread the remaining crème pâtissière and place the last sheet of pastry on top, pressing down again. (Don’t worry if there’s some oozing at the sides. That can be neatened later.)
13. Pop in the fridge while you prepare the icing / chocolate.
14. Melt the chocolate in a bain marie, stirring periodically. Once melted, transfer to a piping bag (or plastic bag with end snipped), resting nozzle side down in a glass or other tall container.
15. To make the icing, whisk 2 egg whites with 2 teaspoons lemon juice until lightly frothy.
16. Whisk in about (2 cups) 300gm of the icing sugar on a low setting until smooth and combined. The mixture should be thick enough to leave trails on the surface. If it’s too thin, whisk in a bit more icing sugar.
17. Once ready, immediately pour over the top of the mille-feuille and spread evenly. I found that I didn’t quite need all of the icing.
18. Still working quickly, pipe a row of thin chocolate lines along the widest length of your pastry sheet. You can make them as far apart/close together as you like. (Again, don’t worry if it looks messy. It can be neatened later on.)
19. STILL working quickly (phew), take a sharp knife and lightly draw it down (from top to bottom) through the rows of chocolate. A centimeter (½ inch) or so further across, draw the knife up the way this time, from bottom to top. Move along, draw it down again. Then up. And so on, moving along the rows of chocolate until the top is covered in a pretty pattern.
20. Once you’ve decorated your mille-feuille, with a clean knife mark out where you’re going to cut your slices, depending on how big you want them to be and leaving space to trim the edges. I got ten out of mine – two rows of five.
21. Chill for a couple of hours to give the icing (etc.) time to set.
22. With a sharp knife, trim the edges and cut your slices.
23. Dig in!

Storage & Freezing Instructions/Tips:
The puff pastry dough will keep in the fridge for up to two days. Any leftovers can be well wrapped up & frozen for a year. Thaw for 30 minutes on the counter or overnight in the fridge.

The completed mille-feuille can be made a day or two in advance; it will last 2 or 3 days in an airtight container in the fridge, though will become less crisp.

October 23, 2012

roasted broccoli

Print Friendly

featured on foodgawker and tastespotting

I’ve posted a fair amount of main dishes, like pizzas and pastas, but not too many side dishes. When it comes to sides, I usually do a big pile of steamed veggies. When you’re cooking after a long day of work, this is one of the easiest and most healthful things to do. Throw some broccoli, spinach, or kale in a steamer basket, five minutes later you’ve got your side dish. But sometimes I want something a little fancier.

Enter roasted veggies. Roasting broccoli is SO EASY. Chop it up, toss with some oil, salt and pepper, and maybe some other herbs if you’re feeling fancy, put it in the oven for 20 minutes while you prep your main course and TADA! Your side is done! And as long as you didn’t drown it in oil, it’s totally healthy! Fast and healthy, that’s usually my goal for dinner.

Tips: If you want to fancy this dish up, squeeze some lemon juice over the top of the broccoli when it comes out of the oven, and top each serving with grated or shaved parmesan cheese. Ooh-la-la!

roasted broccoli

makes 2 servings

  • Ingredients
  • 3 cups raw broccoli florets
  • 2 cloves garlic, sliced
  • olive oil
  • salt and pepper

Preheat the oven to 450 degrees.

Toss the broccoli and garlic with a little bit of oil, just enough to lightly moisten the broccoli. Season with salt and pepper.

Lay on a rimmed baking sheet in a single layer. Roast for 10 minutes and toss. Roast for another 10 minutes and eat!

October 15, 2012

cayenne-rubbed salmon with avocado salsa

Print Friendly

It’s been a week filled with live music. Last week I was lucky enough to see Metric at the Greek Theatre and Bad Books at the Troubadour.

I love live music. Music in general is inspiring, but there’s something incredible about live performances. It’s transformative, motivating, captivating, uplifting. There are some days when I’m so tired and stressed that the last thing I want to really do is stand on my feet for three or four hours at the end of the day, but every single time it’s so worth it. I walk out of the venue feeling spiritually invigorated (and then the physical high wears off and I’m physically tired again. But lets ignore that part).

I bought some salmon fillets on Saturday, intending to cook them on Monday, but was unable to. Come Tuesday (the night of the Metric concert) I needed to cook them before they spoiled. I threw this together, including clean up, in less than 30 minutes so we could run out the door to the show.

This is such a great, simple recipe. The spicy salmon goes so well with the buttery, cool avocado. It’s very adaptable too.

Tips: Don’t have cayenne pepper? Use chili powder instead. No onion, cilantro, or lime juice on hand? Just top the salmon with sliced avocado instead. Want a salsa that’s a little more complicated? Add minced garlic, jalapeno, and corn.

cayenne-rubbed salmon with avocado salsa

makes 1 serving

  • Ingredients
  • 1/2 small avocado, diced
  • 1/2 small red onion, diced
  • 1/4 cup cilantro, chopped
  • 1/2 tablespoon lime juice
  • 6 ounce salmon filet
  • 1/4 teaspoon cayenne pepper
  • 1/4 teaspoon black pepper

Gently toss the avocado, onion, cilantro, and lime juice. Season with salt and pepper.

Pat the salmon dry. In a tiny bowl, combine the cayenne and black pepper. Rub onto both sides of the salmon.

Spray a small pan with oil and heat over medium-high heat. Add the salmon, skin-side down, and cook for about 4 minutes. It’s time to flip when the salmon looks 1/2 – 3/4 of the way cooked through on the sides. Flip and cook for another 3 minutes or so, until it’s a nice golden brown color. Don’t overcook it, or it will be dry and yucky.

Plate the salmon and top with the avocado salsa.

Pages:«1234567...13»

About

Healthful cooking can happen
to anyone. You don't have to know a lot about cooking or be a foodie to prepare and enjoy nutritious homecooked meals! Read more...

Most Popular

Subscribe


Get new recipes sent right to your email:

ADVERTISEMENT

my photos on tastespotting

my foodgawker gallery

ADVERTISEMENT

Instagram


FeastieBar

ADVERTISEMENT