

Creamy potato salad gets a spicy kick from Sriracha and Dijon mustard in this very easy Mendocino Farms copycat recipe.
My favorite sandwich shop in Los Angeles is Mendocino Farms. While diehard sandwich traditionalists love Bay Cities for their Italian deli sandwiches, I prefer the creative options at Mendocino Farms.
Is it strange to remember the first sandwich I tried from their menu? I think it was in 2009 or 2010 I went to their location in Marina Del Rey with my friend Gabe and ate the “Not so Fried” chicken sandwich. Essentially it’s shaved, roasted free range chicken topped with crunchy bits to inspire the taste of fried chicken, without using a fried chicken breast. It’s complimented by herb aioli, mustard pickle slaw, tomatoes, pickled red onions on toasted ciabatta with a side of chipotle BBQ sauce or mustard pickle remoulade. Definitely not your typical sandwich.
We even chose Mendocino to cater our birthday party.
They also serve freshly made deli salads. My favorites are the curried couscous salad and their spicy dijon potato salad.

Sean also loves Mendocino Farms, especially this salad. Which is why I tried to recreate it at home. I’m also trying to figure out how to possible incorporate Mendocino into our wedding. Maybe do a relaxed rehearsal dinner with catering from Mendocino?

Speaking of wedding planning. Wow. I am just so blown away with how expensive a wedding is. I’ve been saying it repeatedly, but I always thought the “average wedding cost” of $25,000-27,000 meant everyone was drinking Veuve Clicquot and eating filet mignon. Nope. A “simple, no-frills” wedding can easily run you $25,000 base price in a major city.
While I’ve mainly been focusing on trying to find a low-cost venue + catering + rentals solution in Southern California, I’ve also been starting to think about other elements such as the cake (am I obsessed with cake?), an officiant, and florals. I’m kind of all over the place, which is fine since we don’t want to get married for another 16+ months or so…
But any and all planning calendars have been really helpful. One of the better ones is from Wedding Paper Divas. It’s an interactive timeline starting at 12 months up to the day of your wedding and includes advice and videos on everything from how to choose your bridesmaids dresses, when to do a trial run for hair and makeup, and how to plan your honeymoon.
Another great resource has been A Practical Wedding’s budget spreadsheet, however, I wasn’t too thrilled when I went by the higher end of the industry average percentages for each item and ended up with a total of nearly 150% instead of 100%. Which is actually the problem I’m coming across often. A venue + catering costs 60% of our budget instead of the average 50%. Photography is twice as much as the recommendation.
How do you cut down on your expenses when nothing else exists at a lower price? It’s quite frustrating.
One of the things we’d like to do is find a non-traditional caterer (one that is not considered a “wedding” or “special events” caterer) and use them for our food. While I love food and would like to feed our guests a creative menu, I just can’t see us spending over $10,000 to feed people for just one meal! I mean, how many needy families could we provide for with that amount of money?! Surely more than just 100 individuals.

Which leads us to barbecue. Inexpensive, casual, delicious. If we’re lucky, there will be Spicy Dijon Potato Salad too. If we’re really lucky, we’ll find time during our wedding night to sit down and eat the meal. I have my fingers crossed.
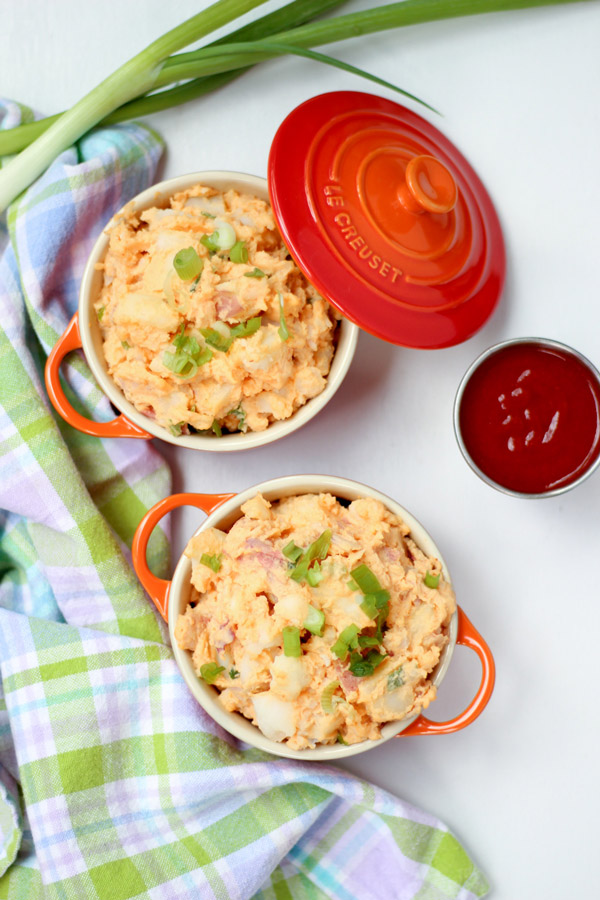
This potato salad is spicy, tangy, and creamy. Pouring apple cider vinegar on the potatoes while they’re cooling imparts them with an acidic flavor that later balances out the richness of the mayonnaise and yogurt. The Sriracha added here gives a bit of a kick, but it’s not overwhelming. If you’re not too fond of spicy food, start with 1/2 tablespoon of Sriracha and go from there.


Ingredients
- 3 pounds red potatoes, cut into 1/2 inch cubes
- 3 tablespoons apple cider vinegar
- 1/2 cup mayonnaise
- 1/2 cup greek yogurt
- 2 tablespoons Sriracha
- 2 tablespoons Dijon Mustard
- 3 green onions, sliced
- salt and pepper
Place the potatoes in a large pot and cover with cold water. Add some salt to season the water and bring to a boil over medium high heat and then reduce to low until cooked through, about 5 minutes. Drain, then place in a large bowl. Add the vinegar, toss, and allow to cool.
To make the dressing, add mayo, greek yogurt, Sriracha, and Dijon mustard to a bowl and stir to combine.
Smash about half the potatoes against the side of the bowl. Add the dressing to the potatoes and toss to coat. Sprinkle with the green onions and toss to incorporate them into the salad.
The potato salad can be eaten immediately, but tastes best after it's been refrigerated for a few hours or overnight.
https://www.nowyourecook.in/2016/05/18/spicy-dijon-potato-salad-mendocino-farms-copycat/